Summer Prep: The Substitute Binder
It’s in-service week. You have multiple meetings during the day, and your room to get set up by Meet the Teacher night in three days. Oh, and you’re emergency sub plans are due by Friday!
Sound familiar? One of my goals this summer has been to tackle those things I know will be due in those first few weeks of school while I have more time to do it. The first of those has been my substitute binder. Free resources are linked at the bottom of this post.
What I started to include in my binder because of the great resources I read:
- The Great American novel, detailing every moment, every student, and every possible thing that could go wrong. (Hey, it’s summer, right?)
What I actually included in my sub binder:
- Two Page Spread as soon as you open binder
- Page 1: The daily schedule (with duties), my specials schedules, contact information (office and nurse), and when/were to turn in attendance/lunch count
- Page 2: Map of the school, with the staff restroom, vending, specials classes, and my duty marked. My principal sends out a floor plan every year, so I put it in PowerPoint and used drawing tools to mark it up.
- Section 1: Class Information – Rosters, Routines, and Seating Charts
- A list of basic classroom routines – bathroom, pencils, quiet signal, etc. One page, with bullet notes.
- I created another two page spread – rosters/notes, and a seating chart. My plan is take a picture of each group to include after school starts.
- Section 2: Lesson Plans
- A generic lesson plan form and plan that I can tweak when I know I will be out ahead of time. This is on my computer, not printed out.
- A note that if there is no plan in this section to turn to the emergency plans.
- Section 3: Emergency Procedures
- What to do during a fire drill, tornado drill, earthquake drill, and lock downs.
- Section 4: Emergency Lesson Plans
- My school requires a week’s worth, including copies if needed.
What I learned:
- It can be tempting to over plan and over share about students. Keep confidentiality in mind.
- Photos and maps – sometimes you have substitutes who have never been in your building. A picture is worth a thousand words. You can create a map of your classroom using this tool from Scholastic.
- Keep it pithy – use bullets, and consistent formatting to make things easy and quick to read.
Resources
- A free editable sub binder from The Curriculum Corner. It is very comprehensive, I only used portions of this resource.
- This online article from Teach Thought, which also includes links to emergency plan ideas and five minute time fillers.
- A free How to Prepare for a Substitute handout from Clutter Free Classroom. Also comprehensive, it lead me to want to include ALL THE THINGS, but it is worth reading.
Inspiring Information – a Nonfiction Reading List
Unless you’re a modern day Leonardo da Vinci, I’m sure you’ve faced a topic or unit that you were required to teach that didn’t cause an instant burst of enthusiasm. It’s perfectly natural, but I’ve found that teaching and learning require passion – genuine passion as children can detect phony from fifty yards away. When I don’t have that natural enthusiasm, I look for ways to generate it in myself. I’m sharing my process for tackling a unit that I don’t have a natural love for in this series of posts. I’m looking at you, nonfiction.
Once I take a good hard look at the unit and myself, it’s time to dive in and learn more from people who are enthusiastic and passionate about the topic. Reading has never failed me, and there are phenomenal teacher authors who mentor me through their words – some I go back to time and again, some new who can shed additional light on a subject. I want to share with you these writers, and hope they can help you as they have helped me.
I started my teaching life as a history teacher, and found my way to Janet Allen. She writes in a real and honest way that has always made me feel that we were discussing strategies over a cup of coffee. Her works are a winning combination of a realistic assessment of some of the problems we face in literacy instruction combined with strategies that can be put in to place immediately. I know there will be strategies and ideas in these texts that will help me plan my unit.


My issue, though, isn’t planning, but passion. So I turn to Kylene Beers and Bob Probst of Notice and Note fame. If you haven’t read Notice and Note, stop reading this post and order it immediately. (Or ask your literacy coach, they probably have a copy. ) They have been teachers, they have worked with teachers, and they also write in a very accessible way. They have a passion for all things reading and in helping children become better readers and you can feel that in their writing. It is impossible to not become enthusiastic.
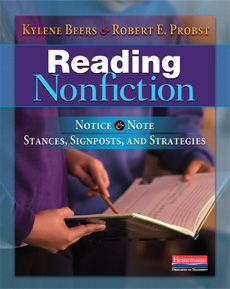
In this work Beers and Probst work to define nonfiction, discuss how nonfiction reading has different requirements of the reader than fiction, and identify “signposts” that should tell the reader when to stop and, well, “notice and note”. The signposts are the real meat of the book, and it includes model lessons for each signpost as well. Well worth reading and discussing, I recommend it!
Once I have gone to my print mentors and immersed myself in a topic like this, I can’t help but become excited to teach it. Who are your favorite print mentors for nonfiction reading?
Nonfiction Notions
Filed under: Nonfiction, Informational Text, Ramblings, Uncategorized |
 Leave a Comment
 I love reading literature! I love to teach literature, and writing narratives, and writing about our reading! I sometimes miss how much simpler my life was when my focus was entirely on history, but I would not trade the last six years of teaching an integrated class for anything. Language, and how we acquire it, grow in it, become skillful in it is both a fascinating puzzle and a real responsibility because reading and writing are as important to our students’ development as breath.
I do not love reading informational text. Given the choice between a biography and a novel, I will choose the novel. Every. Single. Time. We are all asked to teach things we don’t love though, for the betterment of our students. When I am faced with teaching something I am not naturally passionate about, I challenge myself to find the passion. I firmly believe that passion is necessary for teaching because it is hard to convince your students to care about a subject or skill if you don’t.
The first thing I do in this case is challenge my assumption about the topic. Do I really not love it? I say I don’t love informational text, but I do love my new InstantPot, and I’ve spent hours researching recipes, watching YouTube videos, and troubleshooting dishes. I say I don’t love informational text, but I watch the news every night, and read articles from the paper and magazines about things happening in the world. I say I don’t love informational text, but I love reading books and blogs about teaching – researching strategies and testing them out to see if they work for my students and myself. Hmmmm.
If I were honest, I’d say I probably spend half of my reading time as an adult consuming informational text and enjoying it. So why am I convinced I don’t love it? Maybe what I really don’t love is inauthentic informational text. “Test prep” informational text. Keeping the definition to just text, when in reality we receive information from multimedia sources as well. Reading informational text not to solve a problem, to answer a question, or to make a decision, but just to check off the requirement. There must be purpose for passion.
Once I have challenged my assumptions, I read, read, read. I’m reading an amazing book, Reading Nonfiction by Kylene Beers
Plot Structure Charts and Google Apps
My students and I recently finished reading War Horse during our World War I unit. We focused on summarizing the action and comparing/contrasting characters during the reading, because Joey changes owners and sides so frequently during the novel. I wanted us to wrap up or study with a review of plot structure so I decided to have my students create a plot structure chart in Google Drawing based on a template that I found and modified. When I offer this option again, I will have the students work in Presentation, so that is the template that I will share here.
Here is a sample of the work I received:


(Note: I’m not sure what it is about working on computers that dulls my students’ sense of when to capitalize, but this is something we are working on.)
I spent a great deal of time coming up with a rubric for plot structure, because I felt the ones I had access to were too specific to the product and not detailed enough on the skill. I wanted something that would apply to any plot structure product, or for that matter, a plot structure conference or test. After much thinking, and much reading of sample rubrics, this was the end result:

You can download a PDF of the file here Plot Structure Grading Template OR this is the google docs version if you want to try out Goobric.
Things that went well:
- Students were far more motivated working on the plot structure charts via the computer than they were doing them by hand first quarter.
- Students saw a purpose for the analytic notes I had them take throughout the novel, many reported that they wished they had added more detail to their notes and felt that they would next novel. (Progress!)
- The grading! It took a long time for me to settle on the criteria for my rubric, but it has made the grading quick and relatively painless. I copied the rubric right in to my student’s work, and highlighted their scores. I still made a few individualized comments, but overall, most of what I would have said was already on the rubric. I also plan on using the data from my students’ scores to plan additional instruction/practice on analyzing plot structure for those who need it.
Things I would do differently:
- Use Google Presentation instead of Google Drawing. It would have been easier to insert the rubric.
- Use Doctopus to distribute the file and Goobric to automate the insertion of the rubric into my students’ work.
- I would have the students peer edit by sharing their Presentation with another student – I really wish I had taken the time to have the students do this.
- I might even have the students post their finished projects on a Padlet for a digital gallery walk.
If you are interested in plot structure, you may be interested in the following post as well:
Why Google Apps?
Filed under: Google Apps, Technology, Technology Integration | Tags: Google Apps, Technology
Comments (1) I mentioned in my last post about my current love affair with Google Apps for Education. Before I go any further, I thought I should share with you what this is and why it is great for teaching and learning. If you are already on the bandwagon, have a great day and look for my next post.

Google Apps for Education is a suite of cloud computing apps that include word-processing (Docs), spreadsheets (Spreadsheet) , a presentation software (Presentation) , and a website creation capability (Google Sites) that are all contained in “the cloud” instead of on a local machine at school or home.
Why is this a big deal?
- If the software is in “the cloud” there are no more compatibility issues with work happening at school and at home – no worry about what version of PowerPoint the child has or if they have Word, but not Excel, etc. If they can connect to the internet, they have access to the same software they were using in class.
- If the work is in “the cloud” there are no more issues with “I left it at school” or “I left it at home” or flash drives that may or may not work or file compatibility. If the work is in “the cloud” it is always accessible any time an internet connection is available.
- Google Apps for Education is cross platform – which means that it doesn’t matter if you are working on a PC or a Mac, an iPad or an Android tablet – Google Apps is accessible across all devices.
- Google Apps is free. Your school or district may have already set up accounts for your students, and if it hasn’t, suggest it to them!
Still with me? All of these things are awesome, it is true, but that is not what really makes Google Apps special. What makes it special is how it allows students to collaborate and how it makes feedback from peers and teachers easier and more direct.
For example:
- For peer conferencing, students share their Google Doc with another student and they leave written comments for each other embedded in the text. Student can highlight awkward or unclear sentences to point out or make suggestions. The teacher then has access to every comment made within the text.
- Teachers can insert feedback where it is needed in clear typed notes – pointing out grammatical errors, or highlighting words that would benefit from stronger word choice, or whatever writing skill is the focus of the piece.
- The teacher has access to the document without physically picking it up, so comments can be made on works in progress.
- Comments can be made via your iPad, laptop, or desktop computer without taking stacks of papers home to assess.
- In my experience, students are much more likely to revise typed work versus handwritten work. It allows students to focus on the revision versus the sometimes laborious task of rewriting an entire assignment.
In short, these are some of the reasons I love working with Google Apps, and in my next few posts will be focusing on how I use Google Apps for Ed in the classroom. My first experiment was in using shared folders, which I wrote about here.
Working with Google Docs
Filed under: Technology Integration | Tags: 1:1, Language Arts, Technology, technology tools for teachers
Comments (1) Edited to add this note: If you are new to the idea of Google Apps, you may be interested in this introductory post.
It all started a couple of weeks ago when I came across this image on Pinterest:
![]()
My district is going 1:1 iPads in grades 3-5 next year, so I was searching for ways to go paperless. I am a leap in and try it out kind of girl, so I immediately implemented this as a way to keep our electronic work for War Horse and World War I organized. These are my thoughts two weeks later.
1) Google Apps is so much easier to manage than Edmodo.
I can access their folders anytime, make comments, and students can revise their work. I like being able to pull up their folder with all of their assignments, versus having to go into each individual assignment in Edmodo. Edmodo is still useful for student communication and a classroom hub for this year, but I think next year I will be all Google all the time.
2) The folder works as a portfolio.
I really love being able to see all their work for the unit in one place. I can easily click on a previous assignment to see if they are making the same mistakes or to monitor their growth. When I used Google Forms to have them reflect on the unit, it was really great for them to access their first assignments to compare their writing with their later assignments and they recognized the growth they had made. Powerful. Next year, I think I will have them create folders for each of the main categories of the Common Core Standards so that they can track their progress all year.
3) Feedback rocks!
I love being able to comment directly in their paper at the point where I notice the “glow or grow” area. Students can easily read my comments because they are typed and they don’t have to struggle with “squished” notes in the margins. I allowed my students to revise their work, and had them change the name of the document to “revised” if they wanted me to look at it again. Since their work was typed already and easily accessible, several students are actually revising their work!
This experience has led me to more advanced ways of using Google Docs. I will be experimenting this week with adding a script called Doctopus – something that will automate the file creation process and then using another script called Goobric, which will attach a rubric into the document that you are grading. If you are currently using Google Docs, and want to take it to the next level, please do an internet search for these scripts. Teachers are generous, and there are many videos and “how to” pdfs online.
Wish me luck!
Plot Structure Questions Chart
Filed under: Elements of Literature, Historical Fiction | Tags: Forty Acres and Maybe a Mule, Plot Structure
Comments (5) Every year, my students help me to become a better teacher. We will run into some type of a mental road block, and together we will need to think our way through it – this always results in a new way of teaching a piece of content and honestly, it is one of my favorite things about teaching. I love the puzzles!
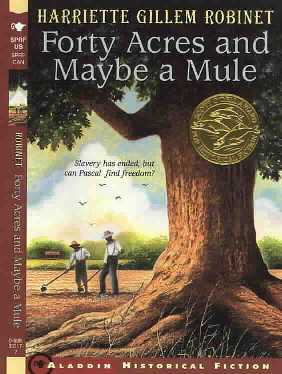
This year we hit a stumbling block with plot structure. Not the definitions, those were easy enough to learn. Not with discussing the novel we read, Forty Acres and Maybe a Mule, that seemed to go okay. (Notice the word choice “seemed”) The problem came when I asked my students to apply their learning to their own novels, and it became clear that they needed more support.
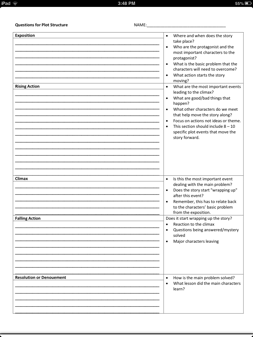
As my former principal used to say, “The smartest person in the room, is the room.” It was time to revisit our class novel and the concept of the plot structure chart. We had finished the book two weeks ago, and I assured the class that was actually a good thing as what we would remember now were the major plot points. Using my Promethean board, we brainstormed the people, places, and events in the story. Then we sorted each of our responses into the appropriate category: exposition, rising action, climax, falling action, resolution. Where the information was incomplete, I thought aloud and asked myself questions, adding to the categories.
Then we went through the categories to see how the basic problem intertwines through the plot, how it reaches its high point in the climax, and then has to be resolved. I have decided that I am going to leave out the word “exciting” when teaching about climax next year, at least initially, because that word has been a stumbling block for my students this year. We also made a record of the questions that I asked myself and them to clarify our thinking. Those questions I turned into the chart that I am sharing with you today – a Questions for Plot Structure chart as an option for those students who the plot structure pyramid charts confuse. I am also sharing the completed Questions for Plot Structure – Forty Acres and Maybe a Mule Example that my students and I created together.
I hope this is helpful to some of you! How do you teach plot structure?
If you were interested in this post, you may be interested in a more recent post:
Free resources for planning with the Common Core
I will be going full force with the Common Core and standards based grading this school year and have been reading anything I can get my hands on. I like to start with theI just wanted to share with you some websites that I have found useful in planning for Common Core instruction this year.
http://www.isbe.net/common_core/htmls/resources.htm
This is a collection of resources from the Illinois State Board of Education. I really like their ELA Teaching and Learning Strategies, for both Literature and Informational Text. Each standard includes Strategy/Lesson suggestions and ideas for assessment. I’ve included a screenshot of one standard below:

http://commoncore.tcoe.org/Search/Query/General/Resources/7068babd-5f8c-4070-9ac3-e98dd2113193
This site is from Common Core Connect, a website of the Tulare County Office of Education in California. This document, for each standard, lists the standard and its anchor, essential skills, academic vocabulary, question stems, and the standard for the grade below and the grade above. I’ve included a screenshot of one standard below:

These are also available as bookmarks that you could hole punch and put on a binder ring.
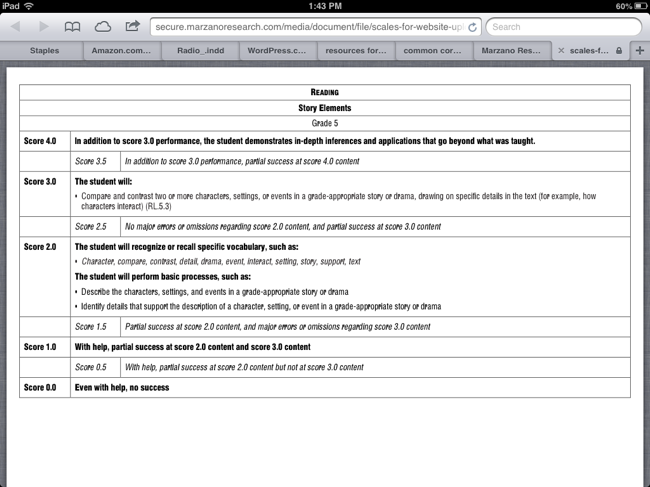
A last site that I am using in my planning process is the Marzano Research Laboratory, Proficiency Scale Bank. I am transitioning to standards based learning and I plan on creating proficiency scales for each standard I am teaching this year. I always like to look at examples, and there are many on this free website. You will need to create an account though. Here is a screenshot of a sample proficiency scale:
I hope these are helpful to you, and if you have any planning resources for the Common Core, please link them in your comments! Happy planning!
Reading to get ready for the Common Core
I’ve been reading a great deal about close reading as I prepare to teach the Common Core. In close reading as proposed by the Common Core, the teacher decides what passages to analyze and creates a series of text dependent questions to lead students to a deeper understanding. There is nothing wrong with that, but the Core standards also value independence and how is a student going to learn to close read on their own if it is always teacher driven?
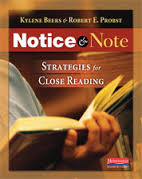
Enter Kylene Beers and Robert Probst book Notice & Note: Strategies for Close Reading, which I just finished reading. This book shows you how to teach students six “signposts” commonly found in fiction that alert the reader to slow down and think about what the author is doing. These signposts teach students how to recognize passages worth analyzing on their own so that they can close read independently. The missing link!
The book is divided into three parts – the first explaining the authors’ thought process in the process of developing these lessons, the middle explaining the and defining the signposts, and lastly, the lessons themselves. The authors developed the signposts by reading the most frequently taught novels from the middle grades and high school to search for features that could be useful across multiple texts. They originally had over a dozen and worked it down to the six most useful on the advice of teachers who were field testing the signposts.
The six signposts are:
Contrasts and Contradictions
Aha Moments
Tough Questions
Words of the Wiser
Again and Again
Memory Moment
The book gives complete lessons for each of these, and suggestions for multiple texts. The authors were not attempting to write a book to help implement the Common Core, and in fact, you can tell they are not crazy about them. Even so, these strategies to bring the reader and text closer together can’t be anything but a good thing!
You can watch a video introducing the book here.
You can view online resources here.
Claiming my blog on Bloglovin
Please forgive this non-content post, but I’m playing around with Bloglovin as my new blog reader and wanted to “claim my blog”.
